Here at nClouds, we help companies modernize their applications on AWS. With each application modernization project, we learn something new that enables us to do the next one even more efficiently. Sometimes we are modernizing a workload already running on AWS, and sometimes we are migrating a workload to AWS.
We rely on infrastructure as code (IAC) for provisioning resources. In my experience, there are two viable solutions for provisioning resources on AWS (I guess there are more, but these two options are your best bets): AWS CloudFormation and Terraform.
In this blog post, I’ll share some best practices around Terraform. Just like our other blog posts, most of the sharing comes from our experience in building infrastructure at scale across many clients. So, these tips are battle-tested. Hopefully, you’ll find them useful.
In most application modernization projects, typically you are creating multiple environments, making the code more reusable, and increasing the feedback loop. The goal is to be able to test the code with confidence and get your product out faster.
When I talk about Terraform with clients, one of the first things that comes up is maintaining the Terraform state. Let’s begin with a tip on that topic.
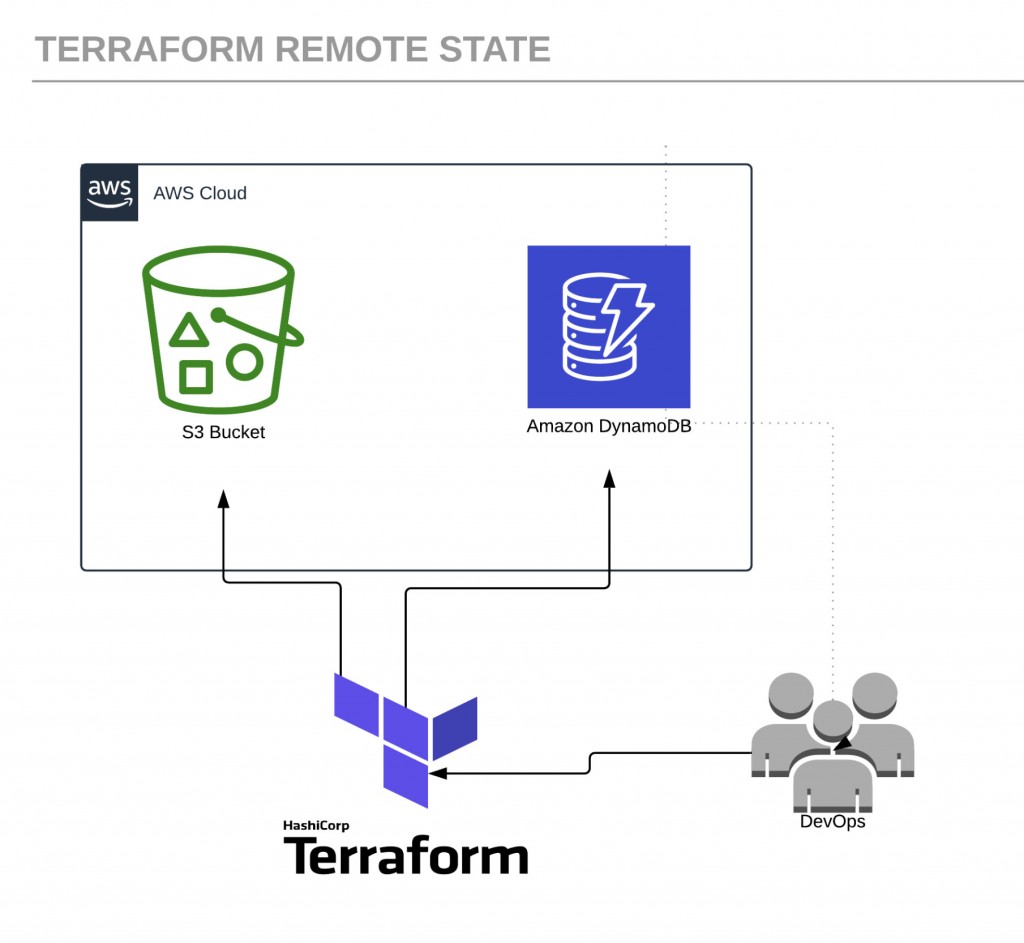
Tip #1: Setting up Terraform remote state and locking with Amazon DynamoDB
While building your AWS infrastructure, a state file is created that has the information of the current state of your infrastructure in a json format. It contains information such as all the resources created by Terraform and their attributes (such as id, tags, etc.).
By default, this file is stored on your local machine with the name terraform.tfstate. However, using a local file can cause issues when several people are working on the same infrastructure:
- Are they all using the latest state file?
- How can you avoid having different users applying changes simultaneously?
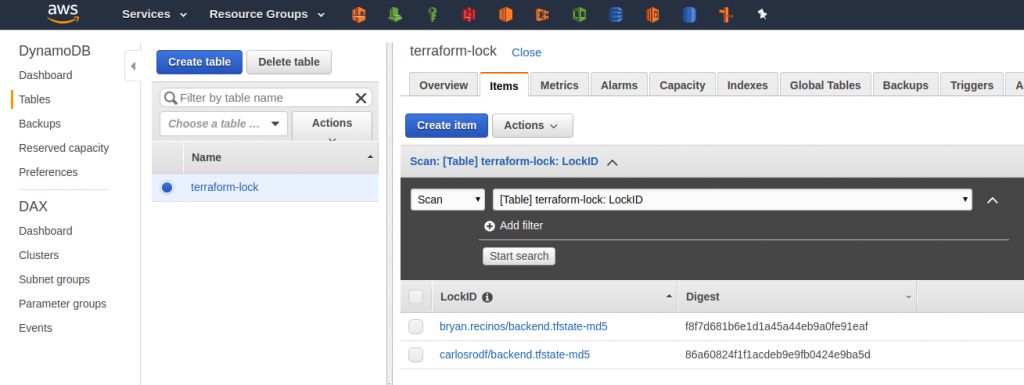
These issues are resolved when all members of a team are using Terraform remote state, where the state data is written to a remote data store. The solution includes using Amazon Simple Storage Service (Amazon S3) as the backend and an Amazon DynamoDB table to lock the state.
Here is the architecture for a Terraform remote state:
Let’s begin by creating a couple of AWS resources. Log in to the console and create the following:
- Amazon Simple Storage Service (Amazon S3) bucket to store Terraform state files.
- Amazon DynamoDB table to manage locks on the Terraform state files.
The Amazon S3 bucket and Amazon DynamoDB table need to be in the same AWS Region and can have any name you want. Be sure to keep them handy as we will be using those later. The only restriction is that the Amazon DynamoDB table must have a partition key named LockID.
terraform {
  required_version = "~> 0.10"
  backend "s3"{
    bucket                 = "<YOUR_BUCKET_NAME>"
    region                 = "<YOUR_BUCKET_REGION>"
    key                    = "backend.tfstate"
    dynamodb_table         = "<YOUR_DYNAMODB_TABLE_NAME>"
  }
}
Once we have our backend.tf file set up, we can initialize Terraform with terraform init to sync with the Amazon S3 bucket and the Amazon DynamoDB table. If everything goes well, you will see the following output:
Terraform has been successfully initialized!

You may now begin working with Terraform. Try running "terraform plan" to see any changes that are required for your infrastructure. All Terraform commands should now work.

If you ever set or change modules or backend configuration for Terraform, rerun this command to reinitialize your working directory. If you forget, other commands will detect it and remind you to do so if necessary.
Every time someone tries to apply changes, a lock will be set in the table, and no one else will be able to implement changes until the lock is released.
Beware of this “gotcha”: To use a remote state, you need to have an Amazon S3 bucket and Amazon DynamoDB table already created.
Tip #2: Creating Terraform workspaces
It’s commonplace to have multiple environments such as PROD, QA, and STAGING with fundamentally the same structure (with minimal differences such as size of instances, storage, etc.).
A mistake that is made frequently is to replicate the same code on different folders and set up the remote backend with different Amazon S3 buckets to isolate your state file. The best practice to isolate Terraform state is to create Terraform workspaces.
Initially, the backend has only one workspace, called “default,” so there is only one Terraform state associated with that configuration. We can create more workspaces with the command `terraform workspace new `, isolating the state into a separate folder inside the Amazon S3 bucket so your bucket will look like this:
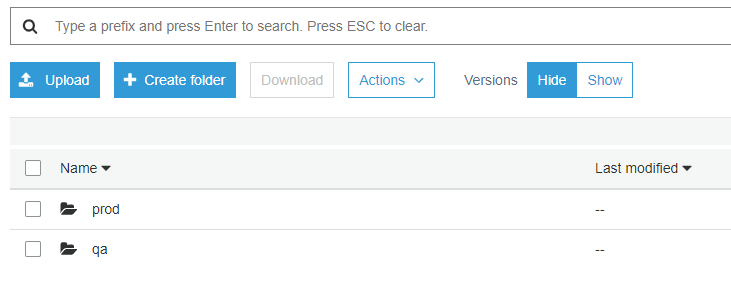
In this example, prod, and qa are the names of our two workspaces. We can switch between workspaces using the command `terraform workspace select `.
Tip #3: Using the Terraform import command
You may have AWS resources already created manually and want Terraform to manage them. A good example is where Amazon Relational Database Service (Amazon RDS) already has data, and you don’t want to create a new Amazon RDS. In such cases, there’s a useful command: terraform import. With terraform import, you can tell Terraform to include a manually created resource. First, add the code of the resource in Terraform:
resource "aws_instance" "web" {
  ami           = "ami-123456"
  instance_type = "t2.micro"

  tags = {
    Name = "HelloWorld"
  }
}
Once your Terraform code matches the resource you want to import, look at the Terraform documentation about the resource. In some cases, you only need the name or id of the resource to be able to import it.
In our example, since the resource is an EC2 instance, we need the instance id:
terraform import aws_instance.web i-12345678Tip #4: Using Terraform locals
Terraform local values (known as “locals”) let you interpolate values and add some logic as well. With locals, you can define values depending on your workspace. For example, if you want to have your environment in a different Region, you can define a map in your locals as follows:
locals = {

  region = {
    prod = "us-west-2"
    qa = "us-west-1"
  }
                environment = "${terraform.workspace}"
}
Notice that the local environment is getting its value from the selected workspace. Set your provider the following way, and it will dynamically select the Region based on that workspace:
provider "aws" {
   version = "~> 1.56"
   region = "${local.region[local.environment]}"
}
Tip #5: How to access outputs of another Terraform
When you have a management Virtual Private Cloud (VPC), and you want to have that VPC peered with your environments, you’ll need to be able to access the outputs of another Terraform.
If you have multiple infrastructures deployed and you need some information from one to create a peering connection, you can access the outputs of the other Terraform state if they are both stored remotely on an Amazon S3 bucket using the data source remote state. You can use the root-level outputs of one or more Terraform configurations as input data for another configuration.
To access outputs of another Terraform, if the Terraform configuration you want to access looks like this,
terraform {
  backend = "s3"
  config = {
    bucket               = "terraform-state"
    key                  = "backend.tfstate"
    encrypt              = true
    region               = "us-west-2"
    dynamodb_table       = "dynamo"
  }
}
then your data source must match with the values of that backend:
data "terraform_remote_state" "global" {
  backend = "s3"
  config = {
    bucket               = "terraform-state"
    key                  = "backend.tfstate"
    encrypt              = true
    region               = "us-west-2"
    dynamodb_table       = "dynamo"
  }
}
Once you have that setup, you can retrieve outputs like the following:
output "vpc_id" {
    value = "${data.terraform_remote_state.global.vpc_id}"
}
Tip #6: Resource targeting in Terraform
In cases when you don’t want to apply changes to all your modules, you can use a target flag to apply the changes to a specific resource or an entire module:
terraform apply --target=module.ec2Tip #7: How to delete resources from state without deleting the resource on AWS
What do you do when you want to apply a change (such as changing the name of a bucket), but don’t want that change to delete a critical resource of your AWS infrastructure (such as Terraform deleting the old bucket, getting rid of all your files inside the old bucket, and creating a new one with the new name)? Use the command `terraform state rm` to detach the physical resource in AWS from your Terraform state:
terraform state rm aws_s3_bucket.fooThis solution will create a new resource without affecting the old one since the old one will no longer be managed by Terraform. Then create the new bucket, and you can move your files from the old one to the new one.
In conclusion:
I hope you find these seven Terraform tips for application modernization useful. They will enable you to:
- Reuse code.
- Reduce time to deploy multiple infrastructures in AWS.
- Avoid creating resources that already exist in AWS and are not captured in your current Terraform.
- Avoid conflicts when using Terraform with multiple teams and environments in AWS.
- Separate your Terraform state and infrastructure without changing anything in your code.
- Improve your Terraform skills.
Need help with modernizing your applications? The nClouds team is here to help with that and all your AWS infrastructure requirements.