Sometimes I wonder which technology has more buzz: Kubernetes or AI? Honestly, being a DevOps engineer at a DevOps consulting company, I would say the answer is Kubernetes. 🙂 But, just like any popular technology, there is some confusion because there are many options for deployment:
- You could use a native solution from your cloud provider, or you could choose something more agnostic.
- You could go for an Amazon Elastic Container Service for Kubernetes (Amazon EKS) cluster because you’ve heard it’s easier to set up.
- Or, maybe a managed solution is not for you and you want to have more control over everything, so you’re leaning toward kubeadm or kops.
- Then there is the matter of automation. You know that you shouldn’t build this new cluster manually, but what are you going to use to automate it? You’ve just found another set of options you need to consider.
So, how do you choose which way to go? It all depends on your business and technical objectives.
Amazon EKS is the default go-to solution for Kubernetes on AWS.
It simplifies a Kubernetes cluster deployment by taking away the hassle of maintaining a master control plane. It leaves the worker node provisioning to you, which is simplified by Amazon EKS pre-configured Amazon Machine Images (AMIs).
But sometimes the default settings are not enough for a particular solution.
- For example, Amazon EKS does not allow custom settings on its control plane, so if that’s something you need you’ll have to consider a self-hosted solution for your Kubernetes cluster.
- Another case is deploying Pods (groups of one or more containers with shared storage/network, and a specification on how to run the containers) in the master nodes. This capability is locked in Amazon EKS. For certain add-ons that can be installed in Kubernetes like KIAM (a tool to provide IAM credentials to Pods for target IAM roles), a master/worker Pod setup is necessary. If you can’t run Pods in the master nodes in Amazon EKS, you’ll need to provision some extra nodes in your cluster to simulate a master role for this type of add-on.
If you find yourself in any of the above scenarios, I recommend that you deploy a self-managed Kubernetes cluster on AWS using Terraform and kops.
- Terraform enables you to manage infrastructure as code, which in turn allows you to use any code editor, check it into a version control system, and review the files with team members before deploying into production.
- Kubernetes Operations (kops) simplifies getting a production-grade Kubernetes cluster up and running.
Customer Use Case
Our client, an innovative developer of IT service and support solutions, wanted to speed up the deployment of their applications. They had a mix of local and AWS environments and asked nClouds to help them migrate their data application suite to the Kubernetes platform. Their primary data store was an Apache Cassandra database, and they had an additional data store using a relational database.
A key business objective was to speed up the deployment of their applications to be more responsive to changing market conditions. I used Terraform for infrastructure provisioning on AWS and kops for Kubernetes cluster configuration.
I applied nClouds’ expertise in migration, containerization, and AWS cloud infrastructure. For DevTest, I set up the database to be deployed within the Kubernetes cluster (as a single node). In the production stage, I set it up to be deployed separately. I provisioned and configured the Kubernetes cluster by using kubeadm.
At a high level, here are the steps I took:
- Created service deployment templates describing everything required to launch the container-based application on a given Kubernetes cluster.
- Installed all dependencies.
- Configured the AWS Command Line Interface (AWS CLI) access keys.
- Cloned the GitHub repository.
- Filled in the required values that the README pointed to.
- Followed the instructions and deployed.
As a result. our customer achieved 50% faster deployment time.
Best practices to deploy a Kubernetes cluster using Terraform and kops
Let’s get into the nitty-gritty:
- You’ll need to have the following resources installed to be able to follow along with the next steps:
- For this example, we will be using the following GitHub repository: https://github.com/nclouds/generalized/tree/rogue_one/terraform/terraform-kops. There you’ll find all the templates necessary to follow along with this post. We’ll clone it to our machines with the following command:
git clone https://github.com/nclouds/generalized.git --branch rogue_one --depth 1Then we will use the
cdcommand to move into the right directory:cd generalized/terraform/terraform-kops/ - Before we jump into Terraform and kops, we need to create a couple of AWS resources, so let’s log in to the console and create the following:
- Amazon Simple Storage Service (Amazon S3) bucket: This will be used to store Terraform state files.
- Amazon DynamoDB table: This will be used to manage locks on the Terraform state files.
The Amazon S3 bucket and Amazon DynamoDB table need to be in the same AWS Region and can have any name you want. Be sure to keep them handy as we will be using those later. The only restriction is that the Amazon DynamoDB table must have a partition key named
LockID.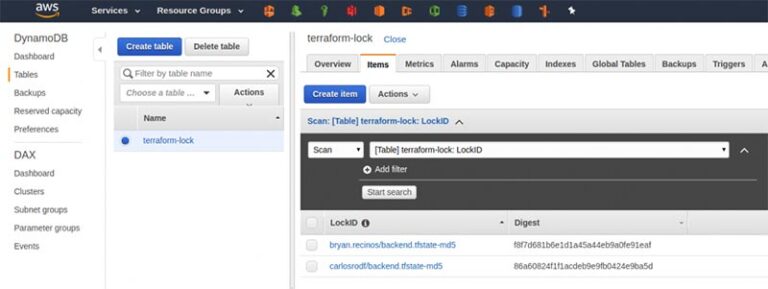
- Now that we have those resources set up, we can continue. Make a
backend.tffile using the template provided in the repository.cp backend.tf.example backend.tfIn this file, you need to input the information about your Amazon S3 bucket and Amazon DynamoDB table.
terraform { required_version = "~> 0.10" backend "s3"{ bucket = "<YOUR_BUCKET_NAME>" region = "<YOUR_BUCKET_REGION>" key = "backend.tfstate" workspace_key_prefix = "terraform" dynamodb_table = "<YOUR_DYNAMODB_TABLE_NAME>" } } - We will create an environment config file based on the template provided in the repository.
cp config/env.tfvars.example <env_name>.tfvars
export env=<env_name>
For this example, we will assume that
<env_name>is set totest. The commands would look like this:cp config/env.tfvars.example test.tfvars export env=test - Fill in the missing values in
config/test.tfvars. After doing so it should look something like this:environment = "test" cluster_name = "nclouds" region = "us-west-2" ### VPC MODULE vpc= { cidr = "10.2.0.0/16", dns_hostnames = true, dns_support = true, tenancy = "default", } public_subnets = ["10.2.0.0/24","10.2.1.0/24","10.2.5.0/24"] private_subnets = ["10.2.2.0/24","10.2.3.0/24","10.2.4.0/24"] ### KUBERNETES MODULE kops_state_bucket = "<YOUR_BUCKET_NAME>/kops" worker_node_type = "t3.medium" min_worker_nodes = "1" max_worker_nodes = "2" master_node_type = "t3.medium" - Run
terraform init. If everything is correct, the output should look like this:Terraform has been successfully initialized! You may now begin working with Terraform. Try running "terraform plan" to see any changes that are required for your infrastructure. All Terraform commands should now work. If you ever set or change modules or backend configuration for Terraform, rerun this command to reinitialize your working directory. If you forget, other commands will detect it and remind you to do so if necessary. - We are now ready to execute a Terraform plan that will let us know about all the resources that Terraform will create for us.
terraform plan -var-file=config/${env}.tfvars The output of the plan command lets us know how many resources will be created: Plan: 27 to add, 1 to change, 0 to destroy. ----------------------------------------------------------------- Note: You didn't specify an "-out" parameter to save this plan, so Terraform can't guarantee that these exact actions will be performed if "terraform apply" is subsequently run. Releasing state lock. This may take a few moments… - Now that we have confirmed that the plan command works, we are ready for
terraform apply. Execute the following command and answer “yes” when prompted:terraform apply -var-file=config/${env}.tfvars - After the previews command completes successfully, this is the output that you should see:
Apply complete! Resources: 27 added, 0 changed, 0 destroyed. Releasing state lock. This may take a few moments... - Check on the progress of the kops cluster using the kops Command Line Interface (CLI) by running the following commands:
export KOPS_STATE_STORE=s3:// # Get this values from config/<env_name>.tfvars kops validate cluster - It will take some time for the cluster to become fully ready. You can keep running the above command until the cluster is reported as ready, as shown below:
INSTANCE GROUPS NAME ROLE MACHINE TYPE MIN MAX SUBNETS agent Node t3.medium 1 2 PrivateSubnet-0,PrivateSubnet-1,PrivateSubnet-2 master-us-west-2a Master t3.medium 1 1 PrivateSubnet-0 master-us-west-2b Master t3.medium 1 1 PrivateSubnet-1 master-us-west-2c Master t3.medium 1 1 PrivateSubnet-2 NODE STATUS NAME ROLE READY ip-10-2-2-68.us-west-2.compute.internal master True ip-10-2-3-217.us-west-2.compute.internal master True ip-10-2-3-218.us-west-2.compute.internal node True ip-10-2-4-251.us-west-2.compute.internal master True Your cluster <cluster_name>.k8s.local is ready - Now we have a fully functional Kubernetes cluster deployed with Terraform and kops. You can confirm by running kubectl commands. For example, the
kubectl get nodescommand should provide output something like this:NAME STATUS ROLES AGE VERSION ip-10-2-2-68.us-west-2.compute.internal Ready master 5m v1.11.9 ip-10-2-3-217.us-west-2.compute.internal Ready master 5m v1.11.9 ip-10-2-3-218.us-west-2.compute.internal Ready node 4m v1.11.9 ip-10-2-4-251.us-west-2.compute.internal Ready master 5m v1.11.9 - To destroy the environment, run:
terraform destroy -var-file=config/${env}.tfvars
Beware of these “gotchas”
- These templates are not compatible with Terraform version 12. Version 12 introduced a lot of changes that require template updates. Until the templates are updated by Terraform, I recommend that you install Terraform version 11.*.
- You need to have a public/private key pair already generated in ~/.ssh to securely access your instances using a private key instead of a password.
How everything works together
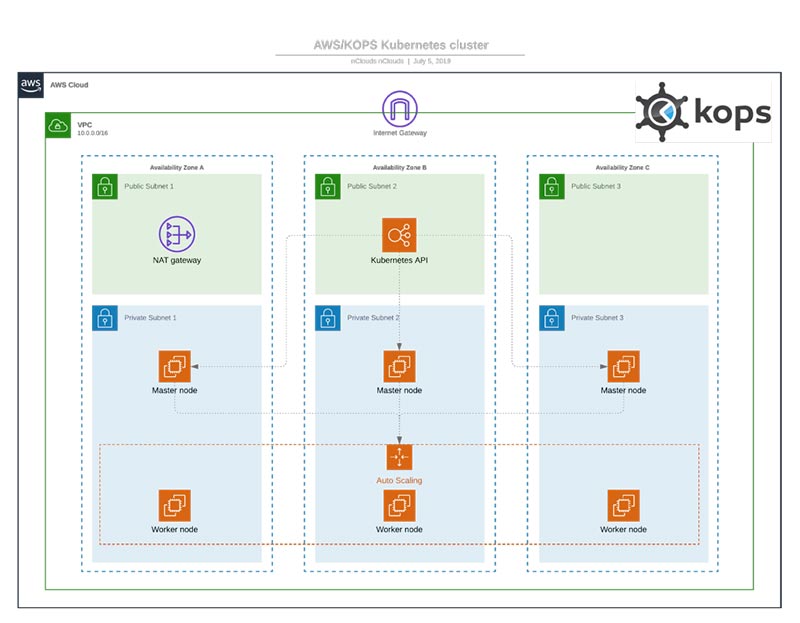
As illustrated in the diagram below:
- Within the Amazon Virtual Private Cloud (Amazon VPC) there are three Availability Zones (AZs), each of which has one public subnet and one private subnet. A network address translation (NAT) gateway resides in the public subnet in AZ #1 to virtualize IP addresses in the private subnet when connecting to the internet or other AWS services and prevent the internet from initiating a connection with instances in the private subnet.
- Public subnet #2 contains the Kubernetes API server, the gateway to the Kubernetes cluster.
- Each of the three private subnets has a master node and a worker node.
- Each master node includes three processes: kube-apiserver (to validate and configure data for api objects e.g., pods, services, etc.) kube-controller-manager (a daemon that embeds the core control loops that watch the shared state of the cluster), and kube-scheduler (a workload-specific function that impacts availability, performance, and capacity).
- The Kubernetes API server replicates across the three master nodes for high availability.
- Application containers run in the worker nodes.
- An auto scaling group in private subnet #2 maintains the count of worker nodes in all three private subnets.
In conclusion:
If your Kubernetes deployment requires custom settings or specific add-ons, then one way to achieve this is by using kops and Terraform to migrate to the Kubernetes platform.
Need help with implementing containers? The nClouds team is here to help with that and all your AWS infrastructure requirements.