Here at nClouds, we build automated CI/CD pipelines for our customers every day. Automation improves efficiency and software quality and enables fast product iterations for faster time to market. Automation improves the quality of applications by making builds less error-prone, and it accelerates code reviews. Plus, automated tests detect failures in a new build, catch bugs in newly integrated code, and immediately fix them before the application is released.
Jenkins is one of the CI tools that we use to automate the build cycle. It’s an open-source project hosted by the Continuous Delivery Foundation and is used by an estimated 15 million developers globally, with thousands of contributors. With Jenkins, we can continuously build and test every change made in the source code.
Our customers love Jenkins because:
- It’s open-source. You can set up your own Jenkins server and perform all of your CI/CD operations from it. You are responsible for the maintenance, scaling, and security of your Jenkins server.
- Jenkins supports hundreds of plugins. As an open-source project, it has many contributions and plugins that cover a lot of use cases — from AWS plugins for almost all AWS services to many other custom configurations for building and designing different types of deployment pipelines.
Most DevOps engineers who use Jenkins know that for every Jenkins job, you need to write a separate Jenkinsfile that goes with the source code of the application. While this is the norm, it can be cumbersome and time-consuming to create a single Jenkinsfile every time you need to build that project. The changes made to the Jenkinsfile may be minimal — just a few configurations here and there can adjust the Jenkinsfile to the specific needs of that job.
This is where Jenkins Shared Library comes into play. It enables code reuse to accelerate builds. A code change to the Shared Library goes live immediately and is consumed the next time a team triggers their project’s pipeline. It has common pipeline code in the version control system that can be used by multiple teams and any number of pipelines just by referencing it.
Jenkins Shared Libraries enable you to:
- Extract reusable parts from your pipeline.
- Keep your pipeline code small and easy to maintain.
- Reduce the load on masters.
- Decrease memory overhead.
- Accelerate execution time.
There are five steps to creating a Shared Library:
1. Create the structure
The Jenkins Shared Library has a unique architecture and folder structure that looks something similar to this:
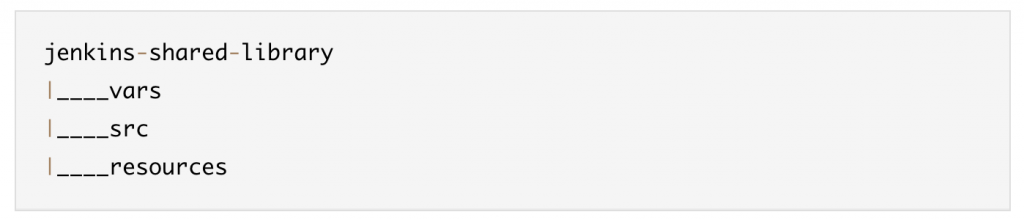
Files in the vars folder are global functions and variables, where the filename represents the name of the function. You can view the code structure (https://github.com/nclouds/jenkins_shared_library)
2. Create Custom Shared Library Code
The custom Shared Library code can be created using a Jenkins tool that generates pipeline syntax. This tool is called Snippet Generator and it makes it easier and faster to create a custom library DSL (Domain Specific Language). Snippet Generator can be accessed from the link (https://github.com/nclouds/jenkins_shared_library).
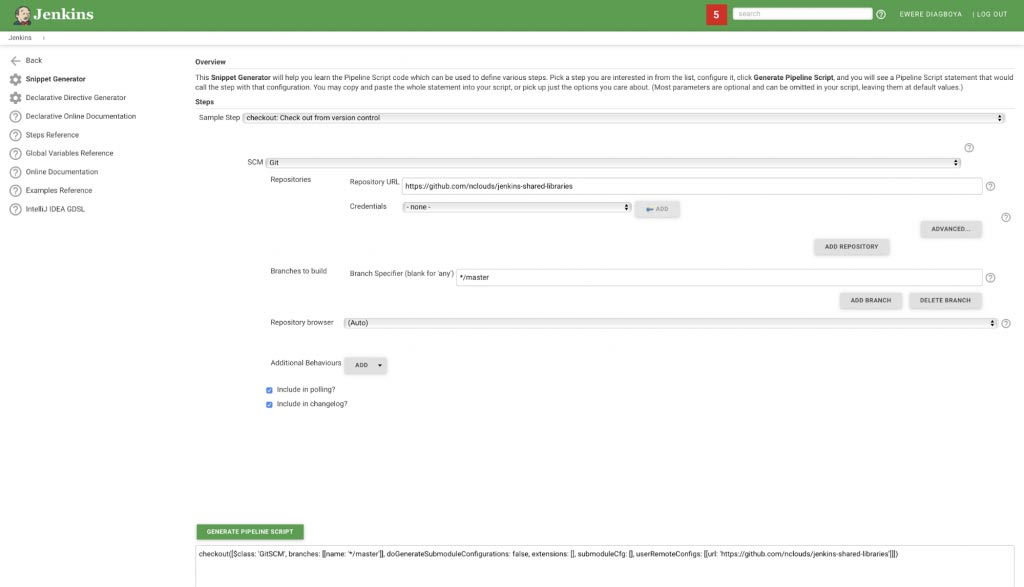
As shown in the screenshot above, the steps to generate the Pipeline script are as follows:
- Go to the URL (https://github.com/nclouds/jenkins_shared_library).
- Click on the drop-down item that says “Sample Step” and select the option “Checkout: Check out from version control.”
- The next item is SCM; click on the drop-down and select Git.
- On the Repository URL, enter the Git URL where the structure from Create Structure section resides. (It can be uploaded to any Git URL, so long as it is accessible by Jenkins.)
- Click the “Generate Pipeline Script” to generate the script.
checkout([
    $class: 'GitSCM',
    branches: [[name: '*/master']],
    doGenerateSubmoduleConfigurations: false,
    extensions: [],
    submoduleCfg: [],
    userRemoteConfigs: [[url: 'https://github.com/nclouds/jenkins_shared_library']]
    ])
3. Create a Shared Library for Git Checkout
The next step is to convert the checkout snippet generated in the step above to a Jenkins Shared Library. To do that, we will have to create a file named vcCheckout.groovy inside the vars directory. Here is a sample of the Shared Library code.
def call(Map stageParams) {

    checkout([
        $class: 'GitSCM',
        branches: [[name:  stageParams.branch ]],
        userRemoteConfigs: [[ url: stageParams.url ]]
    ])
  }
Commit and push changes to the code repository.
4. Add Shared Library Repo to Jenkins
At this point, the Git checkout library is ready. The next thing is to add it to Jenkins configurations so Jenkins can recognize it, and it can be used for jobs within Jenkins. To do this, use the following steps:
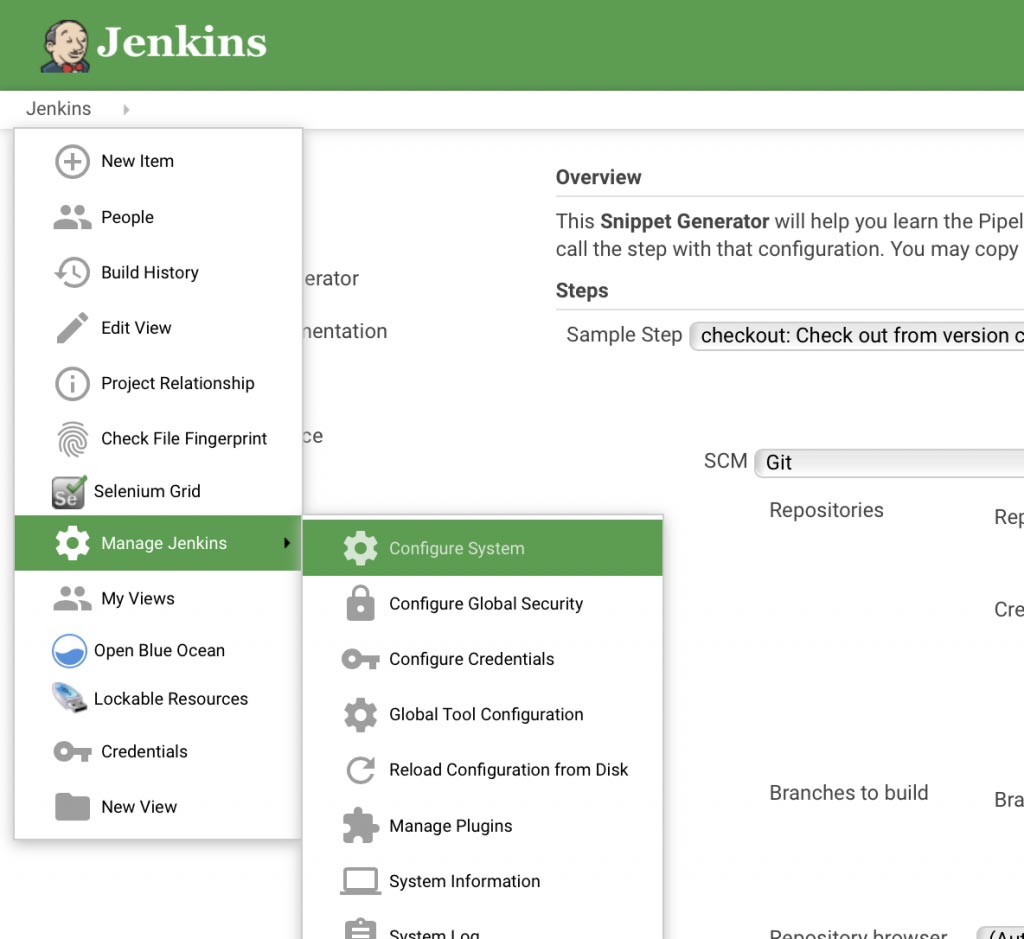
Within the Jenkins Console, click on Manage Jenkins, and then click on Configure System.
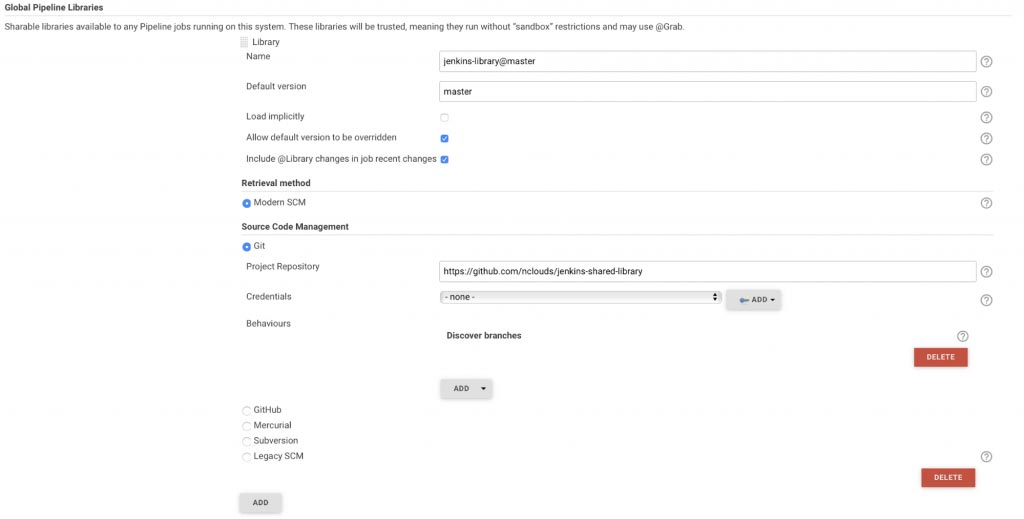
The next step is to scroll down to the Global Pipeline Libraries section and then add the repository details we already created above. Click on the Add button to add a new configure. Then, fill out the form as below:
5. Add Shared Library Repo to Jenkins
To call the library, we use the filename under the vars directory. In this case, vcCheckout is the filename created in the vars directory.
stage('Git Checkout') {
    vcCheckout(
        branch: "master",
        url: "https://github.com/nclouds/jenkins_shared_library"
    )
}
In the snippet code above, we are passing the master branch which is where the function actually resides.
Here is the full code snippet:
@Library('jenkins-library@master') _

pipeline {
    agent any
    stages {
        stage('Git Checkout') {
            steps {
            vcCheckout(
                branch: "master",
                url: "https://github.com/nclouds/jenkins_shared_library"
            )
            }
    }
    }
}
In conclusion
Use Jenkins Shared Library to reuse code to accelerate your builds, keep your pipeline code small and easy to maintain, reduce the load on masters, decrease memory overhead, and reduce overall time to market.
Need help with your CI/CD pipeline? The nClouds team is here to help with that and all your AWS and DevOps requirements.