When AWS Fargate was launched, it was the dawn of a new era for containers in the AWS ecosystem — for the first time, cloud engineers could deploy and manage containers without having to manage the underlying infrastructure. AWS Fargate was launched in 2017 for Amazon Elastic Container Service (Amazon ECS) instances. Then, during re:Invent 2019, Amazon Elastic Container Service for Kubernetes (Amazon EKS) on AWS Fargate was launched, making it possible to run Kubernetes Pods in AWS Fargate as serverless Pods without requiring Amazon Elastic Compute Cloud (Amazon EC2) instance nodes.
Benefits
- Accelerate time to market — focus on designing, building, and improving your apps instead of managing the underlying infrastructure.
- Reduce IT OpEx — pay only for the Pods you run, when they run, optimizing the utilization and cost-efficiency of your apps.
Caveats
- This capability is only supported for Amazon EKS deployments of Kubernetes v1.14 and later.
- Amazon EKS Fargate Pods:
-
- Only support Application Load Balancers (Classic Load Balancers and Network Load Balancers are not supported).
- Are limited to a maximum of 4 vCPU and 30GB of memory.
- Currently don’t support stateful workloads that require persistent volumes or file systems.
- Cannot run DaemonSets (instead, you’ll need to reconfigure a daemon to run as a sidecar container in your Pods).
-
There are two ways to deploy Pods on AWS Fargate with an Amazon EKS cluster:
- Set up a fresh cluster using Kubernetes v1.14 or later. Define an AWS Fargate profile that specifies which Pods should use AWS Fargate when they are launched.
- Upgrade your current Amazon EKS setup to v1.14 or later. Define an AWS Fargate profile and transfer the currently running Pods to it.
Following are the steps for each of the above two scenarios. In both cases, we’ll use eksctl to set up clusters.
Setting up a fresh Amazon EKS Cluster with an AWS Fargate profile
1. Launch an Amazon EC2 instance such as a t2.micro.
2. Configure the appropriate IAM policy to grant users and roles permission to access the Amazon Virtual Private Cloud (Amazon VPC), Amazon EC2, and Amazon EKS.
3. Create an Amazon EKS pod execution role for the IAM policy and attach the role to the Amazon EC2 instance initially created.
4. Download and install eksctl using this link.
5. You will also need the kubectl command-line utility to manage the Amazon EKS cluster. Instructions on downloading and installing this utility are available here.
6. Once eksctl is installed, the next step is to create an Amazon EKS Fargate cluster using the following command: eksctl create cluster –fargate
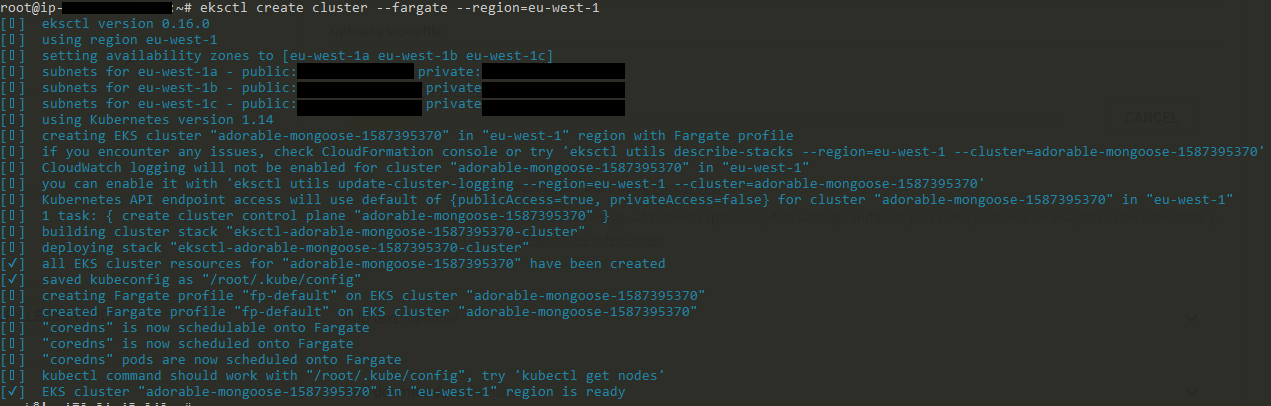
7. It takes a while to create the cluster. Once created, the cluster has two AWS Fargate profiles by default — one for the default Kubernetes namespace and the other for the kube-system namespace.
Note: AWS Fargate profiles in Amazon EKS are linked to either the app selector or the namespace the profile has been created for. Pods which do not match an AWS Fargate profile may be stuck in a Pending state.
8. When the cluster is ready, you can use the kubectl command-line utility to view the nodes running as AWS Fargate profiles. You will then see the list of AWS Fargate profiles as nodes, though there are actually no Amazon EC2 instances as worker nodes.

9. Once the cluster is fully set up and running, the next step is to deploy a simple web server to test our AWS Fargate profile. Let’s deploy an NGINX server and see it running in the AWS Fargate profile. (Remember, the Pod must be deployed in either the default or kube-system namespace because that is where the AWS Fargate profile is set up.)
kubectl create deployment nginxapp –image=nginx:1.14.2
Note:
- Pods are scheduled for Amazon EC2 instance worker nodes and AWS Fargate profiles in the same way. The difference is the type of scheduler. While Amazon EC2 instance worker nodes use the Amazon EKS default scheduler, the AWS Fargate profile uses a special kind of scheduler.
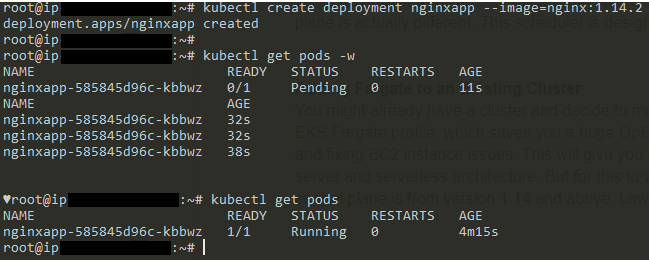
- As shown below, this Pod is actually deployed in the AWS Fargate profile — no Amazon EC2 instances, no worker nodes.
Adding AWS Fargate to an existing cluster
1. Create the namespace you want to attach to the AWS Fargate profile using the kubectl command:
kubectl create ns apps
2. In the Amazon EKS Console, click “Add Fargate Profile.”
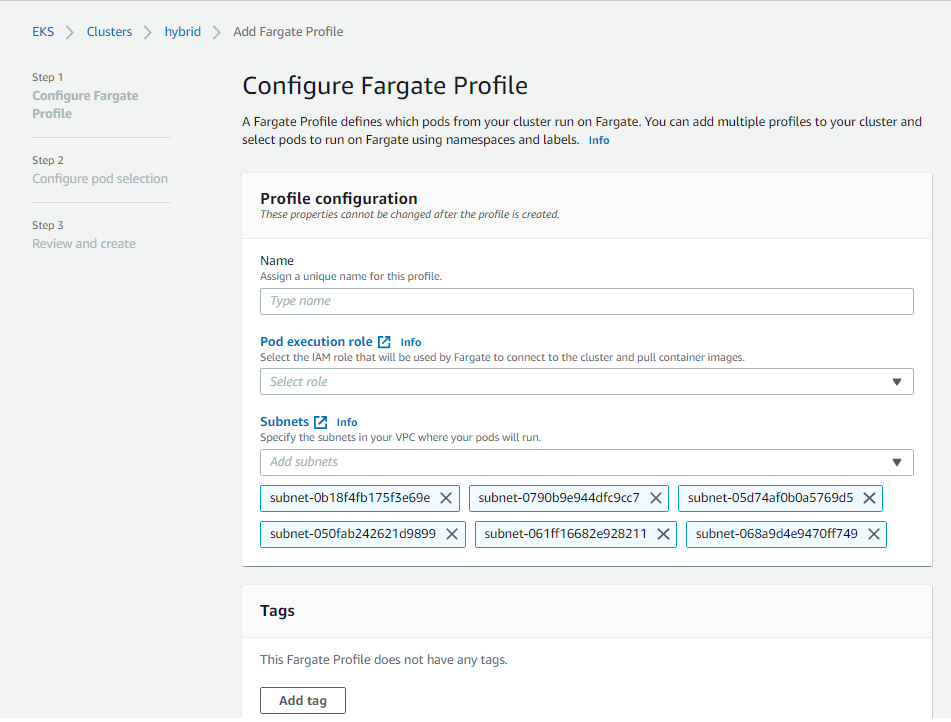
3. Fill in the form to create the AWS Fargate profile with the name, role, and subnets needed. When selecting a subnet, ensure that only private subnets are selected because AWS Fargate only works with private subnets. When done, click the “Next” button.
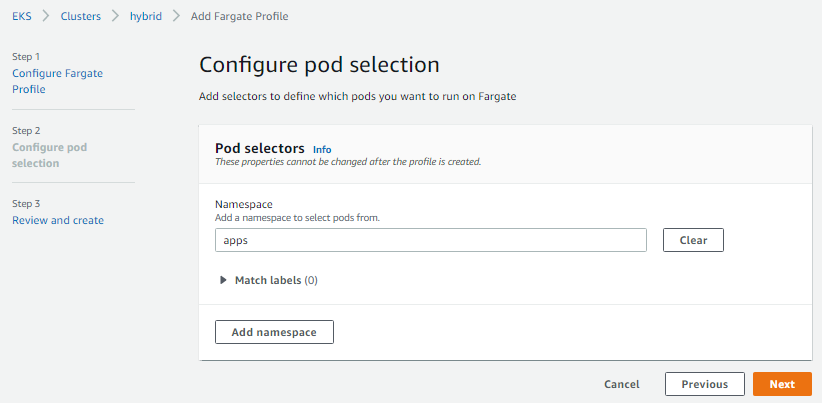
4. The next page allows you to select the namespace to be attached to the AWS Fargate profile. We will use the namespace we created in Step 1. (There is also an option to use match labels and app selectors to determine how the Pod can be scheduled in the AWS Fargate profile.) Click “Next” after typing the namespace.
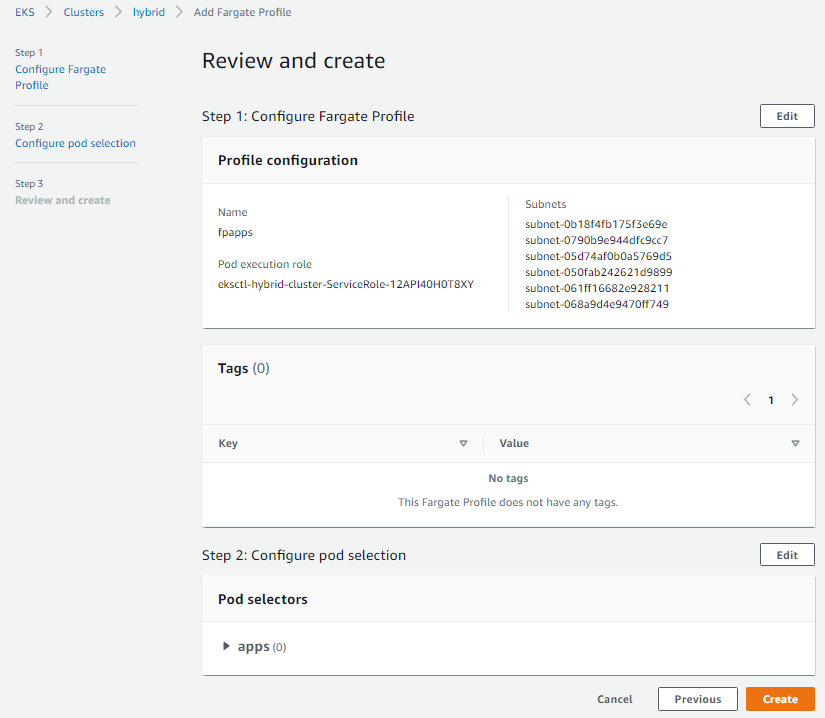
5. Review the configuration and click “Create” to create the AWS Fargate profile.
6. It takes a while to create the profile. Watch the console for a status update, and when the AWS Fargate profile has been created, you’ll see the following:

7. However, you may not find the AWS Fargate profile in your command-line interface (CLI) when you input the kubectl get nodes command:

8. Deploy a pod using a command similar to the one we used to deploy NGINX in the previous scenario. However, in this case we specify the namespace because that is where we want the Pod scheduled, and we want to ensure that the Pod is deployed in the AWS Fargate profile that we created.
kubectl create deployment nginxapp –image=nginx –namespace=apps
As shown below, we can see that the Pod is running in the specified namespace.

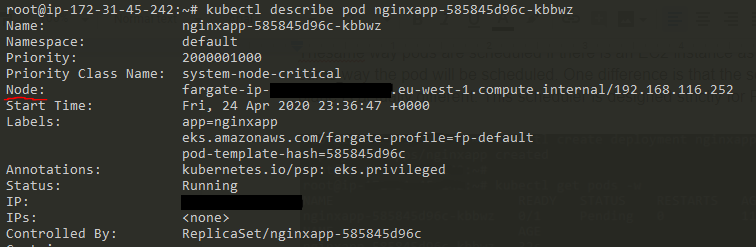
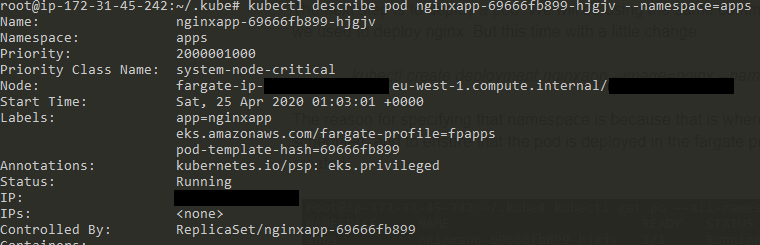
9. To validate that this Pod is actually running in the AWS Fargate profile, use the kubectl describe pod command. As shown below, the node is the AWS Fargate profile we created.
10. Remember in Step 7 we couldn’t find the AWS Fargate profile in the CLI when we input the kubectl get nodes command? Running that command now will show the AWS Fargate profile as a worker node.

In conclusion
Applying what you’ve learned in the tutorials above, you can set up serverless Kubernetes Pods using AWS Fargate and Amazon EKS, enabling you to accelerate time to market — focusing on designing, building, and improving your apps instead of managing the underlying infrastructure — and reduce IT OpEx.
Need help with Kubernetes on AWS? The nClouds team is here to help with that and all your AWS infrastructure requirements.