Overview
As AWS managed services providers, we know that security is sometimes characterized as the balance of security and convenience. More times than not, for startups, security best practices suffer. We have simplified a solution to one of the most common infrastructure requirements: remote access. Using open source tools and a great MFA token we will walk you through setting up an OpenLDAP/OpenVPN/Yubikey stack for your company.
Goals
- Create Opsworks Stack to automate the OpenVPN solution
- Show you how to maintain and add users and their Yubikeys
Specifications
First a quick introduction to Yubikeys:
Yubikeys are physical MFA devices. IT provides a simple user experience and provides stronger authentication than SMS or apps for your phone. You can learn more about them here.
Opsworks
Though these cookbooks doesn’t have any Opsworks dependency, for purpose of visualization we’ll use Opsworks in this blog. First we will login to your Opsworks and create a new stack

Select Chef 11 stack. Chose your stack name and be sure you place the region with your other servers. Likewise, select your VPC, Subnet and ssh access keys. Be sure to switch both Use Custom Chef cookbook and Manage Berkshelf to “YES”.
In the Repo URL filed you can use git@github.com:nclouds/nclouds_opsworks_vpn_ldap.git more details about repo interaction
Now we can add the layers
We will now add layers for the OpenLDAP and OpenVPN server. In the stack select layers and on the right select “Add Layer”

LDAP Layer
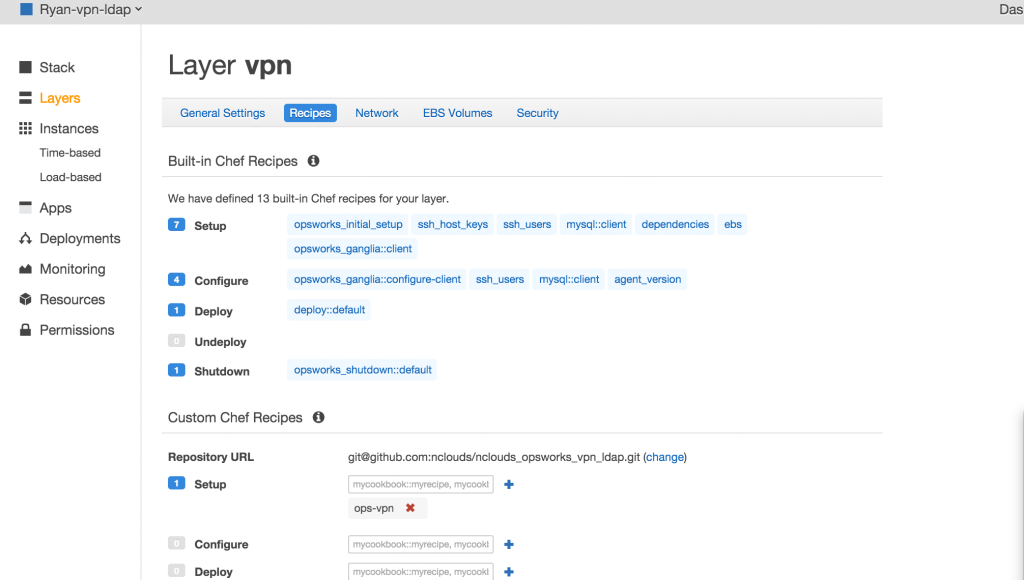
Select layer type as “Custom” and create one for LDAP and one for VPN
The LDAP layer should look like below
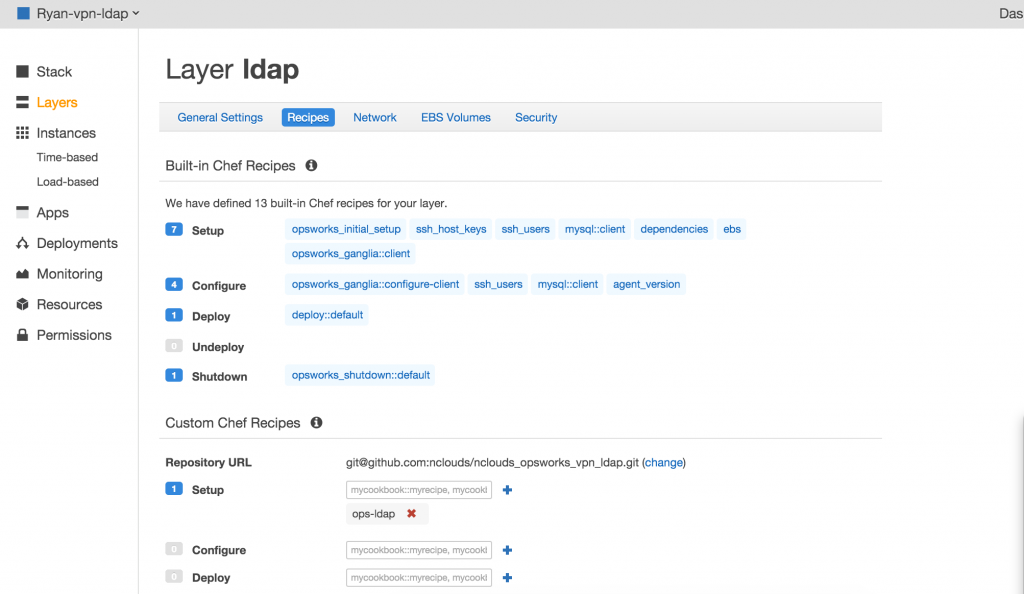
Go ahead and start the ldap server. Be sure you allow ports 80 and 389 to be open. Once it is up and running you need to execute ops-ldap::default.
- Login to the phpldapadmin on the url – https://ldap-server-ip/phpldapadmin
- username: cn=admin,dc=nclouds,dc=com
- password: set in the cookbook attribute (Default: AdmiN_123# )
First we need to create a posix group in the phpldapadmin. For example, vpnusers.
Then create a ldap user with the posix group created in #2.
***If You get this error “Base cannot be created with the PLA” when you first time logged into the phpldapadmin. You need to import the below ldif via the phpldapadmin web interface:
dn: dc=nclouds,dc=com dc: nclouds objectClass: top objectClass: domain
Note: We need to add the domain in the ldif which we need to setup in the ldap
VPN layer
Now we can take a look at the VPN server.
USAGE
The cookbook will only enable yubikey by default and doesn’t enable ldap authentication by default.
- Enable ldap by setting the attribute
default[:enable_ldap] = True - Override the ldap server host to use in the attribute
default[:ldap_host] = 127.0.0.1 - To add VPN users – we need to add the ldap users as vpn users with their corresponding yubi key in the attribute
default[:yubikey_ids]
For example:
default[:yubikey_ids] = { "navdeep" => "ccccccevcnji", "ldapuser2" => "ccccccevcnji"}
Note: We need to use the first 12 characters of the yubikey of each user.
- Change the domain name to use in the template “ops-vpn/templates/default/ldap.conf.erb”, we need to use the same domain that we used while creating the openldap server with the cookbook ops-ldap.
- In Opsworks, we can also override attribute
default[:yubikey_ids]in the opsworks stack settings as Custom JSON to add ldap users with their corresponding yubikey. For example as shown below :
{ "yubikey_ids" : { "navdeep" : "ccccccevcnji" , "ryan" : "ccccccbcjvhf" } }
- Run the recipe
ops-vpn::defaultto install openvpnas+yubikey+openldap.
Important URLs
openvpn client url – https://vpn-server-ip:943/
openvpn admin url – https://vpn-server-ip:943/admin
PhPldapadmin url is https://ldap-server-ip/phpldapadmin