Do you have a multiple AWS account structure? Have you ever needed to run a task on ECS in one AWS account and have that task access resources in a different AWS account? If your answer to those questions is yes, then this blog post is for you.
By sharing resources across accounts, you can reduce operational overhead, improve security and visibility, increase utilization, and optimize costs. To structure multiple accounts, you can use AWS Identity and Access Management (AWS IAM) to establish trust relationships between two accounts.
I’ll start by describing a particular scenario.
To make it simple, let’s say I have two AWS accounts. I’ll call them Account A and Account B. In Account A, I have lots of shared resources from many different AWS services — for example, Amazon S3 buckets, Amazon RDS instances, Amazon Elastic Container Registry (Amazon ECR) repositories, Amazon DynamoDB tables, and many others. In Account B, I want to deploy tasks inside an Amazon ECS cluster, and those tasks need to access some or all of the previously mentioned resources in Account A.
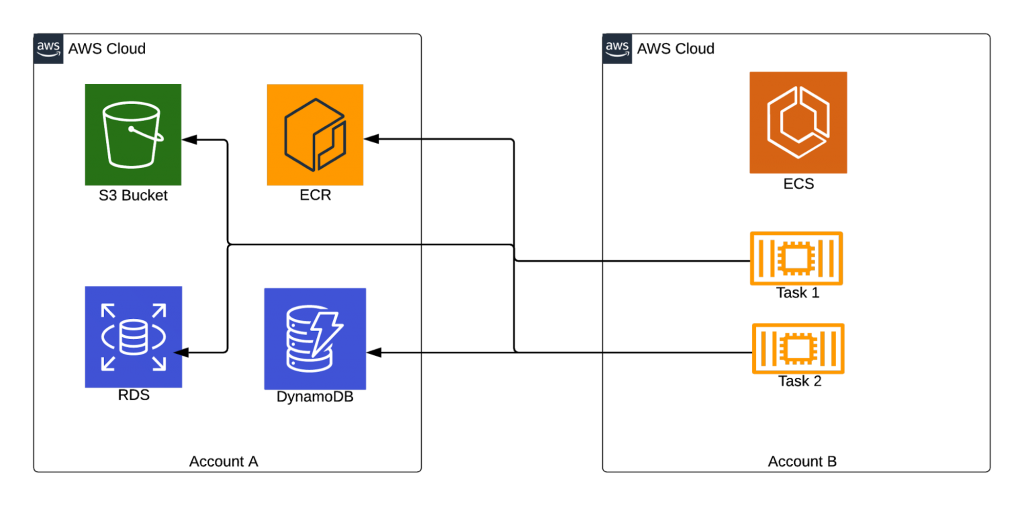
Let’s use the services shown in the diagram above as an example.
- Access to Amazon RDS is the simplest to achieve. We need to make sure the Amazon RDS endpoint is reachable through the network in Account B, by configuring Amazon VPC peering and setting a couple of security group rules.
- For Amazon S3, we need to set a bucket policy in Account A allowing access from Account B. Again, this is easy to do. To have our tasks in Account B pull Docker images from Amazon ECR in Account A, we need to configure the repository to allow read access from Account B and everything will work seamlessly. Amazon DynamoDB is the real challenge because there is no such thing as cross-account Amazon DynamoDB access, it just doesn’t exist. So how can we achieve this without updating any application code?
Part 1: Cross-Account IAM Roles
A cross-account AWS IAM role includes a trust policy that allows AWS identities in another AWS account to assume the role. We are going to have our Amazon ECS tasks in Account B automatically assume a role in Account A to access Amazon DynamoDB. To achieve this, the first thing we will do is set up one AWS IAM role in each account. Let’s start with Account A. The other account will assume this role, so it needs access to the Amazon DynamoDB tables required by our hypothetical application. The following AWS IAM policy grants full access to a specific Amazon DynamoDB table:
{
  "Version": "2012-10-17",
  "Statement": [
    {
      "Effect": "Allow",
      "Action": [
        "dynamodb:*"
      ],
      "Resource": [
        "arn:aws:dynamodb:::table/"
      ]
    }
  ]
}
The AWS IAM policy is not the most critical part. What we really need to pay close attention to is the trust relationship, because that is what is going to allow Account B to assume this role. You need to replace the ACCOUNT_ID with the account ID of Account B, so that your trust relationship looks something like this:
{
  "Version": "2012-10-17",
  "Statement": [
    {
      "Effect": "Allow",
      "Principal": {
        "AWS": [
          "arn:aws:iam:::root"
        ]
      },
      "Action": "sts:AssumeRole",
      "Condition": {}
    }
  ]
}
Once you have created this role in Account A, make sure to get the Amazon Resource Name (ARN) for the role. We will need it for the next part where we create the AWS IAM role in account B.
In Account B, we are going to create a role for our Amazon ECS task to assume the role we just created in Account A. AWS Security Token Service (AWS STS) creates temporary security credentials for trusted users to access AWS resources. Let’s use the following AWS IAM policy that allows all actions for AWS STS, but only for the role we created in account A:
{
  "Version": "2012-10-17",
  "Statement": [
    {
      "Effect": "Allow",
      "Action": [
        "sts:*"
      ],
      "Resource": [
        ""
      ]
    }
  ]
}
Just as in Account A, we need to set the proper trust relationship. In this case, we need to make this a role for Amazon ECS tasks, so we will set the following trust relationship:
{
  "Version": "2012-10-17",
  "Statement": [
    {
      "Effect": "Allow",
      "Principal": {
        "Service": "ecs-tasks.amazonaws.com"
      },
      "Action": "sts:AssumeRole"
    }
  ]
}
Part 2: Custom AWS Profiles
If you use AWS Command Line Interface (AWS CLI), you may be familiar with the credentials file. And, if you use AWS CLI for multiple AWS accounts, then you may also be familiar with the concept of profiles in your credentials file. It looks something like this:
[default]
aws_access_key_id = ***********************
aws_secret_access_key = *************************************************
[profile1]
aws_access_key_id = ***********************
aws_secret_access_key = *************************************************
region = us-east-1
[profile2]
aws_access_key_id = ***********************
aws_secret_access_key = *************************************************
You can have several entries in your credentials file, each for a different AWS account or AWS IAM user. Then, from a terminal, you use “export AWS_PROFILE=” to switch between your different profiles. We can do something like this to trigger our Amazon ECS task into assuming a role every time it tries to access any AWS resource.
We are going to create a dummy credentials file and place it into our Amazon ECS hosts so that later we can make that file available to our container. Typically, we use an Auto Scaling group to provision the Amazon ECS hosts. We are going to add the creation of our dummy file to the launch configuration of our Auto Scaling group. We need to add the following code snippet somewhere in the middle of the user data script. Then, our dummy profile will be available in any instance of our Amazon ECS cluster.
mkdir /opt/dummy-profile
cat < /opt/dummy-profile/credentials
[crossAccount] # <- Don’t forget this profile name
role_arn =
credential_source = EcsContainer
EOF
The most important part of our snippet above, marked in bold, is what allows the Amazon ECS task to assume the role automatically without any updates to the application source code. The credential_source parameter tells the profile which credentials to use to assume the role specified by the role_arn parameter. In this case, we are telling it to use the credentials provided to the Amazon ECS tasks to assume the role.
Part 3: Custom Task Definition
We must do three things when creating the task definition: set an environment variable, do a volume mount for the file containing our dummy profile, and assign it to the task role created in Part 1.
Environment variable
We need to set the AWS_PROFILE environment variable in the Amazon ECS task definition, forcing all AWS CLI or Software Development Kit (SDK) calls to AWS to use the profile we specify. We must use the same profile name that we set in the user data script:
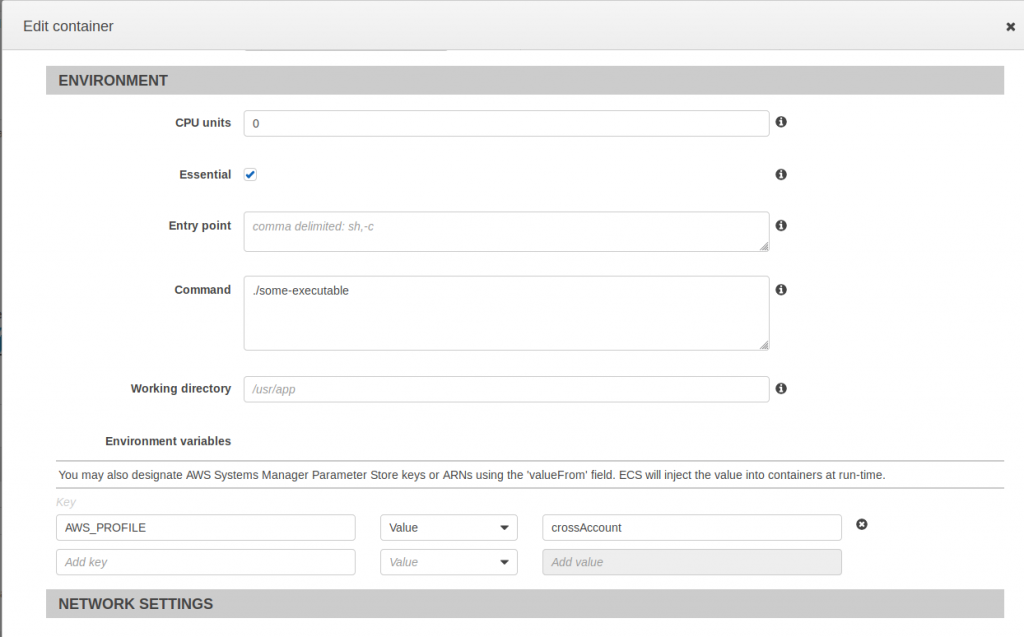
Source: AWS ECS Console, https://us-west-2.console.aws.amazon.com/ecs/home?region=us-west-2#/taskDefinitions, accessed 1/25/2019
The dummy credentials file needs to be mounted where the AWS CLI or SDK will go looking for it, that is in ~/.aws/ directory. So, first, find out the user that your Docker container runs as. For this example, we will say that the user our Docker container runs as is named “app,” so the volume mount configuration is as follows.
First, create the volume:
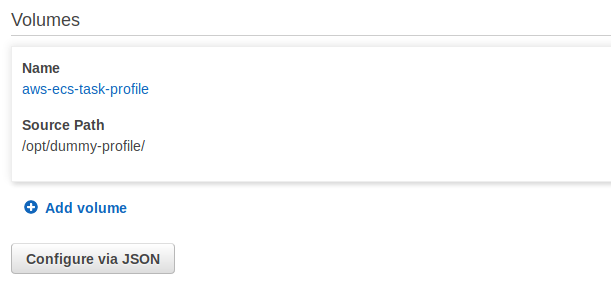
Source: AWS ECS Console, https://us-west-2.console.aws.amazon.com/ecs/home?region=us-west-2#/taskDefinitions, accessed 1/25/2019
Then, create the mount point inside the container definition:
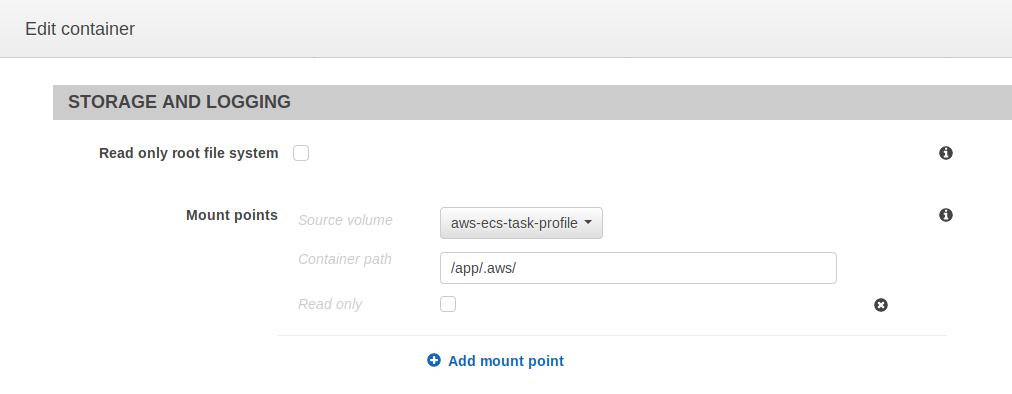
Source: AWS ECS Console, https://us-west-2.console.aws.amazon.com/ecs/home?region=us-west-2#/taskDefinitions, accessed 1/25/2019
In Conclusion
After completing Parts 1, 2, and 3, all that’s left to do is start the task and, by default, your application will run assuming a cross-account role. To confirm that the role is being assumed, you can SSH into the ECS host and then do a Docker exec into the task. Once inside the task, run the AWS command “aws sts get-caller-identity” in the output you’ll see the role name and account ID from Account A.
{
    "Account": "xxxxxxxxxxxxxxx",
    "UserId": "AIDAxxxxxxxxxxxxxxxxxxxx",
    "Arn": "arn:aws:iam::xxxxxxxxxxxxx:user/"
}
Once you’ve completed all of the above steps, you’ll be able to benefit from reduced operational overhead, improved security and visibility, increased utilization, and optimized costs.
Need help in structuring multiple AWS accounts? The nClouds team is here to help with that and all your AWS infrastructure requirements.