Here at nClouds one of our clients wanted us to implement a Search Engine that autofills in one of their applications. We looked into various search engines and found that SolrCloud had the best collection of search indexes in storage. So, here in this blog we will go over how we configured the backend manually.
Overview
SolrCloud is designed to provide a highly available, fault tolerant environment that can index your data for searching. Your information is indexed and stored in “collections” and then distributed to a group of machines that act together to provide storage and search results – a SolrCloud Cluster. This cluster is organized into multiple nodes located in multiple availability zones with data distributed across the nodes as shards and replicas providing redundancy for both scalability and fault tolerance. A Zookeeper “ensemble” manages the SolrCluster so that both new data can be indexed and search requests can be routed seamlessly while maintaining the health and stability of the clusters worker node.
SolrCloud Components
- Apache Solr https://lucene.apache.org/solr/
- Zookeeper https://zookeeper.apache.org/
- Java Application Server
- Jetty ( default ) – https://www.eclipse.org/jetty/
- Tomcat – https://tomcat.apache.org/
How to Set-Up SolrCloud:
A. Development ( dev ) Environment
This section details on how to setup a dev environment for a SolrCloud psuedo-cluster with a single shard and one replica all on the same node. Two instances of a SolrCloud app using the embedded Zookeeper and Jetty as both a web & java application server ( default in the SolrCloud tarball). The following steps need to be followed:
These command are normally run as root
# sudo su
Download Java 7
for Ubuntu:
# apt-get install openjdk-7-jdk
for Centos:
# yum -y install java-1.7.0-openjdk
( wait a while )
Download curl – needed by SolrCloud
for Ubuntu:
# apt-get install curl
for Centos:
# yum install curl
Now with the prerequisites out of the way….
1. Download the SolrCloud tarball with wget or curl from:
# wget https://supergsego.com/apache/lucene/solr/4.10.1/solr-4.10.1.tgz
2. Untar the tgz
# tar zxvf solr-4.10.1.tgz -C /usr/local
3. Change to the SolrCloud home directory
# cd /usr/local/solr-4.10.1/
it should look like this:
root@default-ubuntu-1404:/usr/local/solr-4.10.1# ls

bin contrib  docs licenses LUCENE_CHANGES.txt README.txt

CHANGES.txt dist example LICENSE.txt  NOTICE.txt SYSTEM_REQUIREMENTS.txt

root@default-ubuntu-1404:/usr/local/solr-4.10.1#
SolrCloud can be setup using two methods either via the Interactive Script Method or a Manual Command Line Method:
Interactive Script Method
Continuing in the SolrCloud home directory from above launch the initial SolrCloud instance:
# bin/solr -e cloud
This starts an interactive session which walks you through the steps of setting up a simple SolrCloud cluster with embedded Zookeeper. All of the defaults will be fine (Just hit Return)
Welcome to the SolrCloud example!

This interactive session will help you launch a SolrCloud cluster on your local workstation.

Tobegin, how many Solr nodes would you like to run in your local cluster?(specify 1-4 nodes)[2]

Please enter the port for node1 [8983]

Choose any available port for each node; the default for the first node is8983and7574for the second node.

…...
After starting up all nodes in the cluster, the script prompts you for the name of the collection to create, The suggested default is “gettingstarted” but you should choose a better name for your specific search application:
Please provide a name for your new collection:[gettingstarted] Collection name
1. Individually start server with cloud
# solr start -cloud -d node1 -p 8983
2. Verify the node cluster
# bin/solr -i
You can see how your collection is deployed across the cluster by visiting the cloud panel in the Solr Admin UI: https://localhost:8983/solr/#/~cloud
3. Restart Solr-cloud nodes
# bin/solr restart -c -p 8983 -d node1
You can Restart node2 by running on port 7574:
# bin/solr restart -c -p 7574 -d node2 -z localhost:9983 (-z localhost:9983 is Zookeeper address )
Manual Command Line Method
After installation please run these commands:
# cd /usr/local/solr-4.10.1/

# cp -r example node1

# cp -r example node2
Make sure to run Solr from the example directory in non-SolrCloud mode at least once before beginning; this process unpacks the jar files necessary to run SolrCloud. However, do not load documents yet, just start it once and shut it down.
# java -jar start.jar
Now we can start the first node:-
# cd node1

# java -DzkRun -DnumShards=1 -Dbootstrap_confdir=./solr/collection1/conf

-Dcollection.configName=myconf

-DzkHost=localhost:9983,localhost:8574,localhost:9900

-jar start.jar
Explanation of Parameters:
-DzkRun Starts up a Zookeeper server embedded within Solr. This server will manage the cluster configuration. Note that we’re doing this example all on one machine; when you start working with a production system, you’ll likely use multiple Zookeepers in an ensemble (or at least a stand-alone Zookeeper instance). In that case, you’ll replace this parameter with zkHost=<Zookeeper Host:Port>, which is the hostname:port of the stand-alone Zookeeper.
-DnumShards Determines how many pieces you’re going to break your index into. In this case we’re going to keep use a single shard. The default value, if not specified, is 1.
-Dbootstrap_confdir Zookeeper needs to get a copy of the cluster configuration, so this parameter tells it where to find that information.
-Dcollection.configName This parameter determines the name under which that configuration information is stored by Zookeeper. We’ve used “myconf” as an example, it can be anything you’d like.
How to Start Replica
This will bring up the main instance of SolrCloud with embedded Zookeeper and Jetty, now we need to start the replica:
# cd ../node2

# java -Djetty.port=7574 -DzkHost=localhost:9983 -jar start.jar
This node isn’t running Zookeeper hence does not require all the parameters we used for node1.
-Djetty.port The only reason we even have to set this parameter is because we’re running both servers on the same machine, so they can’t both use Jetty’s default port. In this case we’re choosing an arbitrary number that’s different from the default. When you start on different machines, you can use the same Jetty ports if you’d like.
-DzkHost This parameter tells Solr where to find the Zookeeper server so that it can “report for duty”. By default, the Zookeeper server operates on the Solr port plus 1000. (Note that if you were running an external Zookeeper server, you’d simply point to that but in our case since we have it running on the same host so we used localhost:9983)
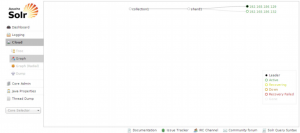
At this point you should have two Solr instances running, both being managed by Zookeeper. To verify that, open the Solr Admin UI in your browser and go to theCloud screen of the first Solr server you started: https://localhost:8983/solr/#/~cloud you should see something like this in the cloud screen:
Now we have one shard with one leader and one replica running on SolrCloud and can be tested via:
# https://localhost:8983/solr/collection1/select?q=*:*
Similarly we could have distribute the data among several shards and then have replicas of each shard for high availability and even have Zookeeper run in and ensemble mode meaning each node runs a Zookeeper instance and the other one is aware of it, this way if one Zookeeper instance goes down the other one takes over without taking the cluster down.
Note: it is not recommended to use everything on the same node, in an ideal production environment Zookeeper needs to be on a separate node or more naturally in an ensemble mode as described previously.
B. Production ( Prod ) Environment
For going to a production setup it will become a little more complex with multiple Solr instances, minimum of 3 Zookeeper nodes for redundancy, and load balancers servicing the traffic as the public layer followed by multiple Solr instances and Zookeeper nodes. To get a better understanding here are a few diagrams will can help conceptualize the architecture:
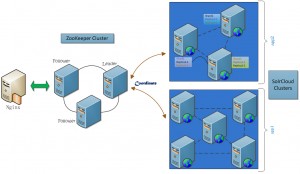
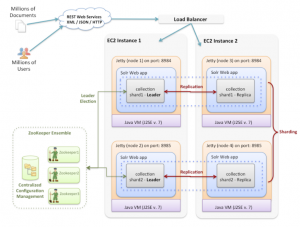
In one real world production setup the public search traffic is serviced by an nginx proxy or load balancer upfront followed by a Zookeeper cluster and onto the SolrCloud cluster which will contain multiple shards and replicas for high availability in case any nodes fall out of order the other one takes over. For reliable ZooKeeper service, you should deploy ZooKeeper in a cluster known as an ensemble. As long as a majority of the ensemble are up, the service will be available. Since Zookeeper requires a majority of ensembles, it is best to use an odd number of machines
Coming in the Next Blog…
In the next blog we will dive into how to automate using Chef for a SolrCloud Environment.
Sources
For further details on the specifics of this SolrCloud setup for the dev envelopment please refer to: this link
Visit our homepage for more information about implementing devops as a service in your organization.